PROCESSING
Bringing out the shadow profile of Plato’s east rim
Tips to boost the impact of your lunar crater images
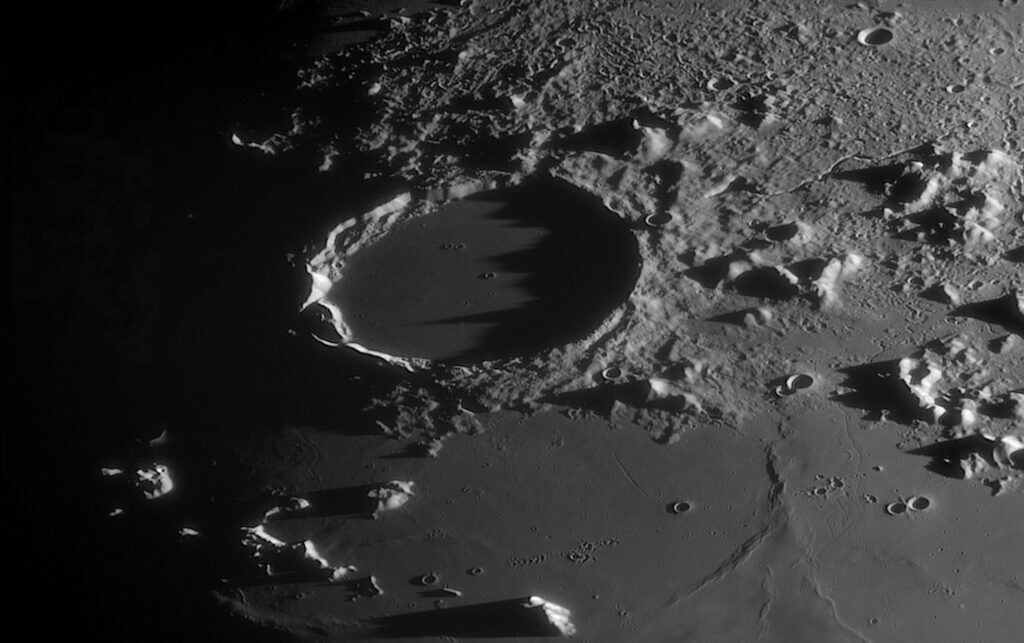
My image of the Plato region of the Moon was chosen as the overall winner in the ‘Our Moon’ category of the 2022 Astronomy Photographer of the Year competition, for which I felt very fortunate. The image relied on three key aspects for its strong impact: low Sun angle, favourable seeing and good composition. The Sun was rising over this particular area of the Moon when I took my image. This meant the jagged shadow from the crater’s east rim was dramatically cast nearly halfway across the smooth lava-filled base of Plato. This represented a shadow length of nearly 72 kilometres (45 miles)!
The low Sun was also important in highlighting surface detail in the surrounding region, especially the mountain peaks and narrow rilles in the upper right-hand side of the image, adding to the strong texture there. The low Sun also revealed the gentle undulations in the lava plains in the smoother lower part of the image, and created the contrasting full darkness on the left side, where that part of the Moon was still in night.
The photograph was taken on a night of very good seeing in April 2021 when the Moon was 60° high to the south. I used my 444mm Dobsonian telescope mounted on a home-built driven equatorial platform, combined with a ZWO ASI174MM mono digital video camera (recommended for lunar and solar captures due to its high speed and large chip size). I also chose a Barlow lens so the telescope was operating at f/29 – giving a magnification that nicely matched the scope’s maximum resolution to the large pixels of the camera. This camera captured 10,800 individual images over a period of several minutes, with an exposure time of 29 microseconds per frame. I used a 642nm red filter in front of the camera to further improve the steadiness of the image.
Out of the shadows
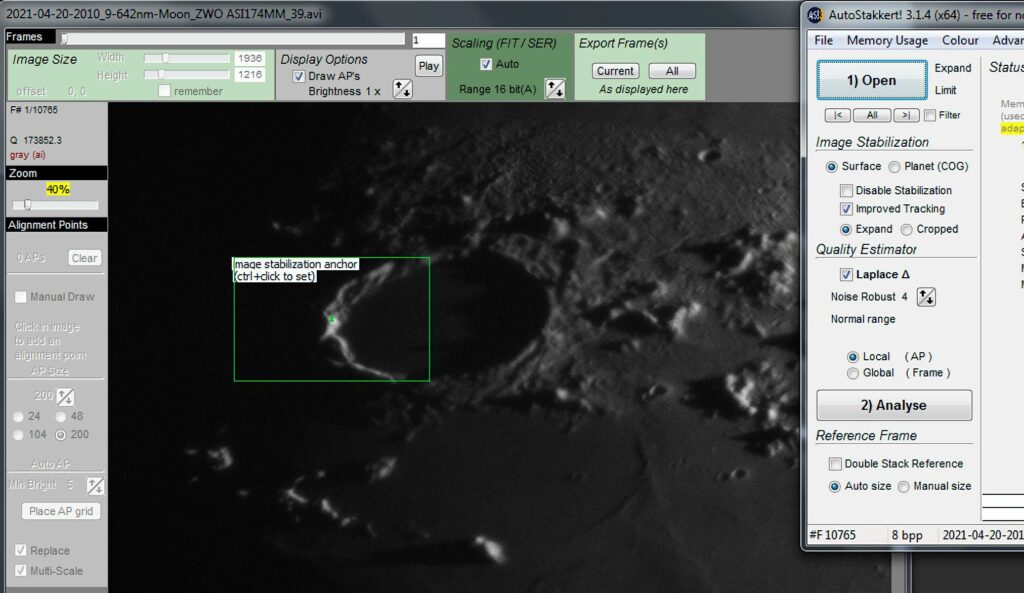
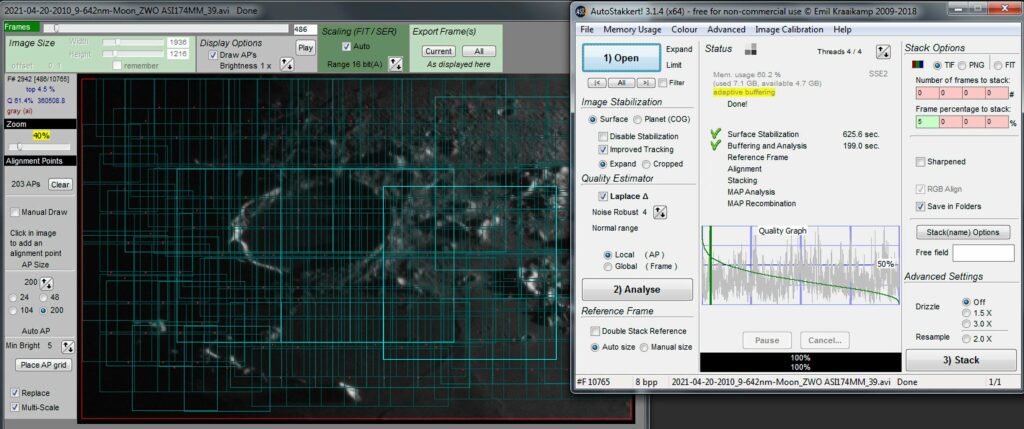
The five-minute video was processed in AutoStakkert! using the ‘Surface’ mode generally recommended for lunar and solar work. ‘Surface’ mode requires picking an obvious anchor feature first – which just had to be Plato. This anchor location was selected by holding down the Ctrl key and clicking on the crater, before then hitting the ‘Analyse’ button (see Screenshot 2).
Once the image had been analysed, the best five per cent of the total frames were selected to be stacked and an AP (alignment point) size of 200 was chosen with automatic placement. This placement divided the scene into 203 separate alignment areas; I picked a low minimum brightness of five, so that alignment areas were allocated even in the dimmest areas of the image (see screenshot 3).
Once I had clicked on the ‘Stack’ button and AutoStakkert! had done its work, quality-sorting and aligning the best frames, the final stacked image was imported into RegiStax for sharpening and contrast adjustment, as shown in screenshot 4. A low level of sharpening of 0.11 in RegiStax was applied at 100 per cent in just the first layer, using the Gaussian mode. I also added a low level of denoise (0.15) to smooth out any noise; not much was required because of the relatively long accumulated exposure duration of 15 seconds (five per cent of five minutes).
As the seeing was so good, only a small level of sharpening was needed to pull out the fine detail, and this really helped to reduce the severity of any diffraction-related ringing artefacts seen around any bright edges and crater rims. It is this lack of obvious ringing artefacts around sharp features and cast against the dark shadows that separates the best lunar images from those that are not quite so good.
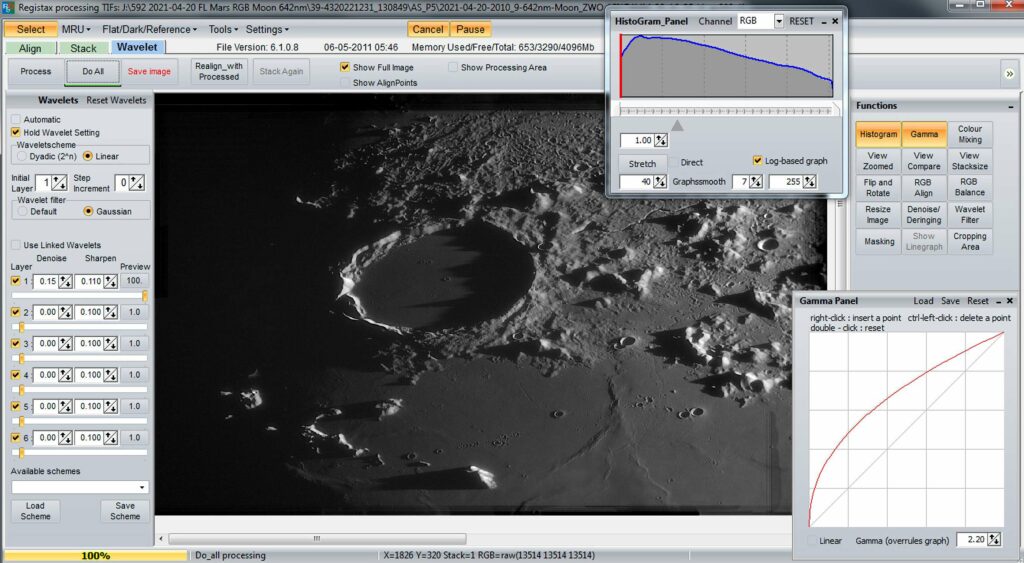
In RegiStax the darker areas were darkened with a bottom-end histogram stretch and the overall contrast actually reduced by increasing the gamma setting to 2.2, as shown in screenshot 4. This improved the overall look of the image, accentuating the shadow of the rim inside the crater of Plato which dominated the middle of the image.
Final processing took place in PaintShop Pro. This involved a further slight reduction in contrast, followed by cropping the edges of the image to make the most pleasing, natural and detailed overall composition, as shown in the final image above.
3 QUICK TIPS
1. For lunar imaging at high magnification, pick the best nights with the steadiest skies and image the Moon high up in the sky.
2. If the seeing is not so good, image larger areas at lower magnification.
3. Don’t over-process as diffraction effects surrounding high-contrast features will become obvious, spoiling the result.