Polar align your star tracker DSLR mount
Increase your camera’s exposure times, while keeping stars sharp, with accurate polar alignment

Take any photo of the night sky with a DSLR camera and after a certain length of exposure, the stars will start to trail due to the apparent movement of the stars (in reality, Earth’s rotation). Not so long ago, you needed a large equatorial mount and some familiarity with the ‘dark art’ of image processing to track the movement of the stars. Today, though, there are many small, lightweight, star-tracking mounts that allow us to attach a DSLR camera with a lens or even a small telescope, and to follow the stars’ apparent movement to get extended exposures.
These portable mounts still have one important thing in common with their heavier counterparts: they require polar alignment to track the night sky successfully. Most star tracker mounts use a small polarscope to align on Earth’s axis of rotation, which, if you extend this line out into space, is slightly offset from the easy-to-locate Polaris (Alpha (α) Ursae Minoris) – the ‘North Star’ or ‘Pole Star’.
Aligning usually means placing the star roughly in the polarscope’s field of view and rotating the right ascension (RA) axis to the correct point, to position Polaris into a small circle on the graticule – the ‘clock face’ pattern that is seen through the eyepiece of the polarscope.
In some cases, you can align an engraved set of constellations on the graticule (such as Cassiopeia and Ursa Major) with their positions in the sky. Your level of success, however, is determined by how accurately you can perform the alignment for your equipment and requirements. A large system with a telescope needs to be more accurately aligned to track the stars successfully.
Longer exposures, deeper targets
Let’s look at how a DSLR star tracker can help increase exposure times with polar alignment. If you are using a star tracker and a camera with wide-field lenses (up to 35mm) then an approximate alignment with Polaris in the centre will typically produce exposures of a couple of minutes. In contrast, if you perform a proper polar alignment, you can push the exposures up to 10 or even 20 minutes with the same lenses, depending on the level of light pollution.
So, the ability to polar align is vital for getting the most out of your DSLR star tracker. In addition, the more accurately you can perform the polar alignment, the longer lenses and exposures you can employ, despite the increased weight on the system.
Our preferred method is to use either the Sky- Watcher SyncScan Pro app (for Android and iOS, bit.ly/3yuVHCQ) or the iOptron Polar Scope app (for iOS only, https://apps.apple.com/us/app/ioptron-polar-scope/id564078961) to show where to place Polaris on the graticule, based on the hands of a clock. By ensuring that the ‘0’ is lined up with the vertical axis of your mount while looking through your polarscope, you can then use either one of the apps to help you position Polaris correctly; just follow the step-by-step guide opposite.
Once you’ve followed the steps you can look forward to capturing great data and producing stunning images. And, as a bonus, you can also use the same method to align your heavier equatorial mount.
What you’ll need
A star tracker, a polarscope illuminator, a tripod, an EQ wedge or a tripod with a normal pan head, and a DSLR camera with assorted lenses.
Step by step
Step 1

Assemble your particular star tracker (for this demonstration we are using the Sky-Watcher Star Adventurer 2i). Attach it to a tripod and roughly aim it towards the north. Ideally, use an equatorial wedge as this helps with latitude adjustment, but if you don’t have one you can try angling the tripod’s panhead instead.
Step 2

Next, ensure that your setup is level by using the spirit level that you’ll find integrated into the wedge, and uncap the mount covers to reveal the integrated polarscope. You can now use the altitude and azimuth adjustment knobs to roughly place Polaris near the centre of the polarscope’s field of view.
Step 3

Attach the polarscope illuminator or use a red torch to illuminate the graticule (left). Unlock and align the RA axis by sighting through the polarscope and rotating it until the graticule has ‘0’ at the top and is in line with the mount body.
Step 4

The polarscope graticule resembles a clock face, so now using either the SynScan Pro app or the iOptron Polar Scope app, find where Polaris should lie along the circle of the graticule for the particular time and date that you’re out under the stars.
Step 5

Using the altitude and azimuth adjustment knobs, sight through the polarscope and position Polaris on the graticule as indicated in the app (Step 4). Remove the polar illuminator and add the camera with a wide-field lens, and start taking exposures.
Step 6
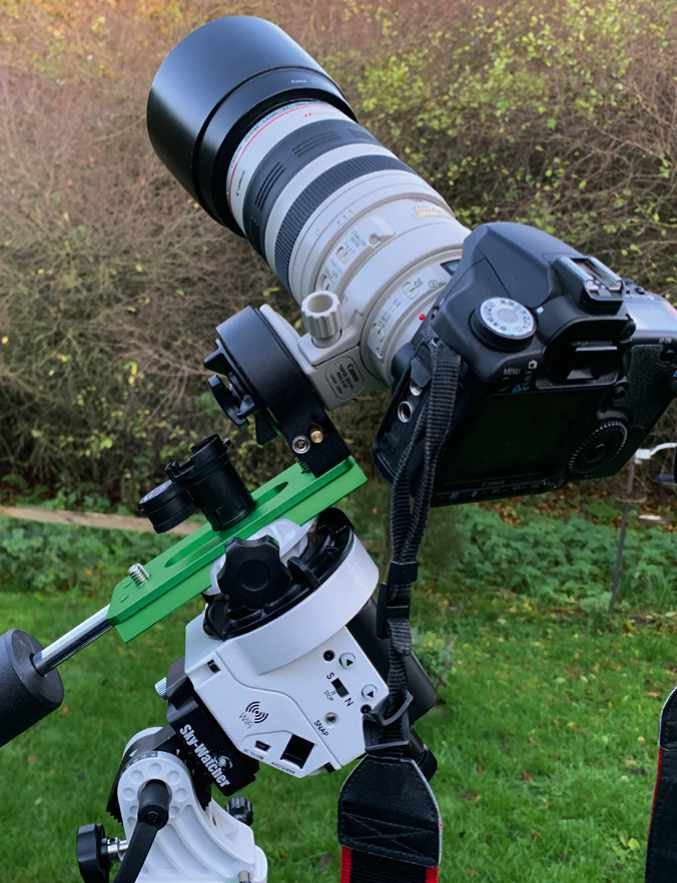
To get closer to your objects you can fit a longer, heavier lens. Use the monunt’s (optional) dovetail L-bracket and counterweight shaft with the counterweight attached here. The bracket has a slot that will allow you to polar align as above with the extra photography equipment attached.

Paul Money is an astronomy writer and broadcaster, and the reviews editor of BBC Sky at Night Magazine